
ProjectM is an open source application that provides beautiful visual effects to accompany your favorite music player. A port of the popular MilkDrop music visualizer plugin for Winamp, ProjectM installs easily in Linux and can integrate with certain music applications. It is also available for BSD, MacOS and Windows.
The best way to get an up-to-date installation of ProjectM is to build it from source. (If you’re not super technical, don’t worry; it’s easier than it sounds.) Just navigate to the ProjectM page on Github, Click the “Clone or Download” button, and save the file in your Downloads folder.
Now, open a terminal and type:
cd Downloads
Next, create a new directory for the ProjectM files and copy the ProjectM file into it:
mkdir ProjectM
cp projectm-master.zip ProjectM
cd ProjectM
unzip projectm-master.zip
cd projectm-master
ls

Next, read all the text files included with the projectm-master download. For example, type:
less BUILDING.md
to view the BUILDING.md file. This file describes the proper procedure to build ProjectM from source.
Next, install all the dependencies for ProjectM. For Linux, the dependencies are:
autoconf libtool libsdl2-dev libglm-dev qt5-default qtdeclarative5-dev libqt5opengl5-dev libjack-dev libpulse-dev libsdl-dev
You may also need autotools, pkg-config, and which.
You will also need to ensure that OpenGL is enabled on your system. Install it with SDL in Ubuntu by typing:
sudo apt-get update
sudo apt-get install libglm-dev
sudo apt-get install libglew-dev
sudo apt-get install libsdl
To begin the installation of ProjectM, make sure you are in the projectm-master directory, then type:
./autogen.sh
./configure
make
sudo make install
If you’re new to compiling, note that there is a bit of a delay between each step. You’ll have to be patient.
ProjectM is also available from the repositories of certain Linux distributions.
Running ProjectM
The simplest way to run ProjectM visualizations is to run projectM-pulseaudio. However, ProjectM integrates into a number of music players. Clementine music player comes with ProjectM pre-installed, so you won’t need to make any changes there. Manual integration of ProjectM into most music players is a huge headache, and probably isn’t worth the time and trouble involved. ProjectM will automatically sync with pretty much any audio that plays on the computer. So it doesn’t matter whether you’re playing music with Rhythmbox, Amarok, Audacious, or from the command line. You can even play music videos on YouTube in your web browser, and ProjectM will still respond right on cue.
Configuring ProjectM
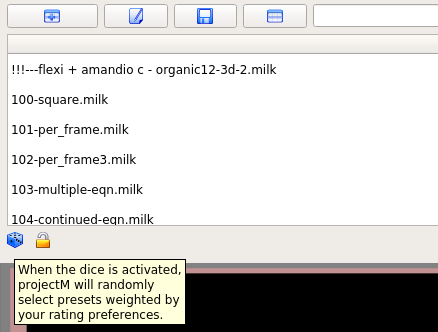
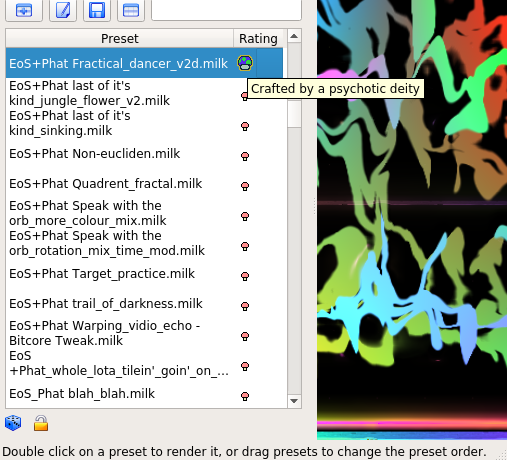
ProjectM operates on presets which are located in /usr/local/share/projectM/presets. You can download and add preset files in *.prjm, *.milk, and *.so formats. You can rate presets, and by clicking the dice icon in the menu window, you can set ProjectM to randomly select presets based on your preferences.
To rate a preset, simply click the icon in the “Rating” column. The lowest rating is “Rather watch grass grow than watch this”, and the highest is “Crafted by a psychotic deity”.
Many more presets are available online on sites like the WinAmp forums.
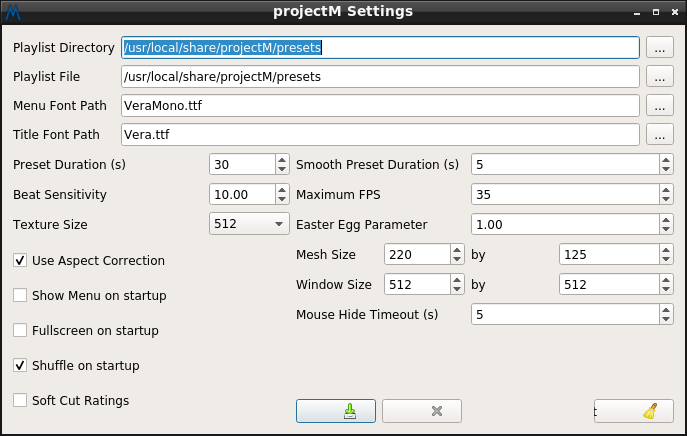
For more configuration settings, click Settings > Configure ProjectM. In most cases it’s best to keep these settings at the default, but with a little trial and error, you can get your visualizations configured exactly the way you like.
Keyboard Shortcuts
It’s easy to control the ProjectM interface with keyboard shortcuts. The hotkey reference recommends pressing CTRL with each hotkey, but you can also control the interface by pressing each letter without CTRL.
CTRL-L locks / unlocks the active preset
CTRL-N moves to next preset in the playlist
CTRL-P moves to previous preset in the playlist
CTRL-R randomly selects a preset from the playlist
CTRL-M show / hide the menu display
CTRL-E opens the preset editor with the active preset
CTRL-F enables / disables full screen mode
CTRL-Y enables / disables shuffle mode
CTRL-S saves and applies changes to the active preset (only when editing)
CTRL-B shows / hides menu and status bar
Additional Reading
How to Install Plex Media Server in Ubuntu 18.04 Bionic Beaver
How to Install PulseAudio-Equalizer in Ubuntu and Linux Mint

Try the Flatpak version. Easy install, works great. I’m on MX Linux….
LikeLike
I want to install the latest version of projectM so from the github page i downloaded the projectm-3.1.3.tar.gz file, and there seems to be less files but the configure is there and there is also an install-sh file there. i am a newbie please help me out. Do i still need to install these same dependencies… specifically i want to know if i should ignore the install-sh file.. the readme file doesnt give any install instructions
LikeLike
i am doing something wrong because when i go for make
i get: make: *** No targets specified and no makefile found. Stop.
it does bug me that this is 2020 and i can only have 4 visualisations on my vlc
i used to have 450 on my winamp 20 years ago!!!
LikeLike
This needs to be solved to make Xubuntu popular:
The following packages have unmet dependencies:
clang : Depends: clang-10 (>= 10~) but it is not going to be installed
E: Unable to correct problems, you have held broken packages.
LikeLike
UPDATE: it works without a problem for me, thanks to the procedure.
It was way easier to install it with Steam, witch I have. Link:
https://store.steampowered.com/app/1358800/projectM_Music_Visualizer
LikeLike